Showing posts with label Copper. Show all posts

Monday, July 30, 2018

Blended Seasons Sneak Peek!

One card, three ways...


July is drawing to a close and I have exciting news about August!  Starting on Wednesday, August 1 there is a fantastic new stamp set with matching framelits that will be available, but only while supplies last!  As a demonstrator, I was able to order this early to play with and I'm loving the versatility of this bundle.


This is the first card I made using my new bundle.  It's clean & simple.  The leaves are stamped with Memento Tuxedo Black and I colored them using my Old Olive, Pumpkin Pie, Crumb Cake & Bronze Stampin' Blends.  The leaf embellishment is cut from Copper Foil.


The stamped panel is 3" x 4-1/4".  The black mat is 3-1/4" x 4-1/2".  The white behind the black mat is 4" x 5-1/4".  The card base is cut from Crumb Cake.


On my second card, I stepped it up a bit by embossing the leaves with Copper Stampin' Emboss Powder.


I love this embossed look, but the big advantage with embossing is how much easier it makes the images to color.  Whether you prefer coloring with Blends, Markers or Watercolor Pencils, the embossing forms a small ridge that keeps the color from bleeding outside the lines.


For my third card, I stepped it up even more by using one of the 3 beautiful framelits included in this set.  These leaves are colored with Rich Razzleberry, Pumpkin Pie & Cherry Cobbler Blends.


These framelits are unlike any others that Stampin' Up sells.  As you can see here, each framelit has stitching on the inside & outside of the shape!


These are some of the samples the Stampin' Up Design Team has created.  This bundle has something for every season! 

Product List - Blended Seasons Bundle Available August 1, 2018

The Buy 3, Get 1 Free Designer Paper Sale ends at midnight tomorrow.  Don't miss out on this chance to stock up on your favorites!


Ten Free Ink Pads! 


If you've ever thought about joining the Stampin' Up family of demonstrators, this is the offer you've been waiting for.

Enjoy savings of 20%-25% on every order from now until at least January 31, 2019!  There's no risk, no pressure & no penalty to drop!  
Email me today with your questions or concerns.  If you're ready to get started, click here to read the fine print & get started!


Wednesday, October 19, 2016

Inspired

Hi Stampers,

Fall is the best time of year, no doubt about it.  I've been inspired to create beautiful fall cards by all the colors of nature.  The cards I've been working on this week use some of my favorite things - Vintage Leaves, watercoloring and copper embossing powder!  Here's my card:


And here's my inspiration:


Aren't those just the best colors?  I tried to duplicate them with my watercoloring - I'm pretty happy with the result, what do you think?

I have to admit, these colors weren't the only thing that inspired me to make these cards.  I watched this awesome video from Patty Bennett and couldn't wait to try this watercolor wash technique.  I could go into more detail about how it's done, but Patty does such a great job explaining it in her video that you really need to watch it!  (Seriously, you'll be inspired too!)

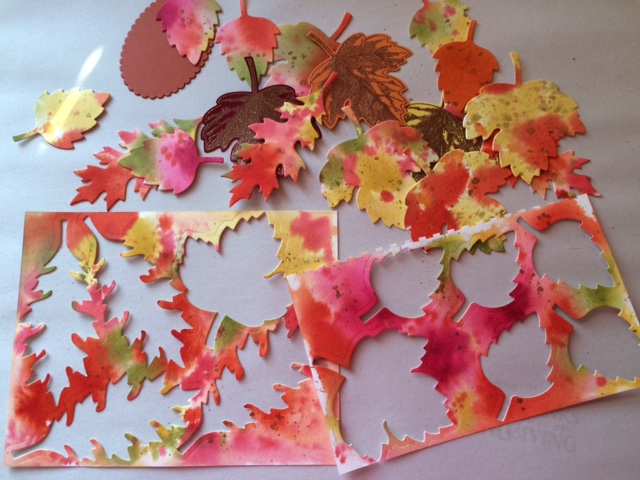
Here are some of the sheets that I cut my leaves from.  Don't be discouraged if you try this and think your watercoloring doesn't look right - there's no right or wrong with this technique.  Every piece is unique and you'll probably think it looks like a mess, until you cut the leaves - then they are gorgeous!


Another thing I used on all of my cards is my favorite embossing powder, Copper Stampin' Emboss Powder.  I'm amazed every time I use it at how quickly and smoothly it melts.

Isn't that beautiful?  So elegant and perfect for Fall!

Once I got started making these cards, I couldn't stop.


I really couldn't stop.  I made birthday cards, and thank you cards, and hello cards, and missing you cards, and Thanksgiving cards.  I call it my all-purpose card for Fall :)


This is actually my first time playing with Vintage Leaves and the Leaflets Framelits.  I wanted it when it first came out last year but didn't get it, so I was really happy that it was carried over into this year's annual catalog.  If you like fall decorating, there is so much you can do with these leaves besides make cards!  Imagine wreaths, garlands, scrapbook pages, tabletop decorations, placecards, napkin rings, classroom decorations, the list goes on and on!

You can shop for any of the supplies to make your own inspired cards by clicking on the Shop Now link on the left side of this page.  Please be sure to leave your contact information when you order to get a special "thank you" from me.

Happy stamping,
Pat


Saturday, October 1, 2016

Christmas Wishes from Across the Miles

Hi Stampers,

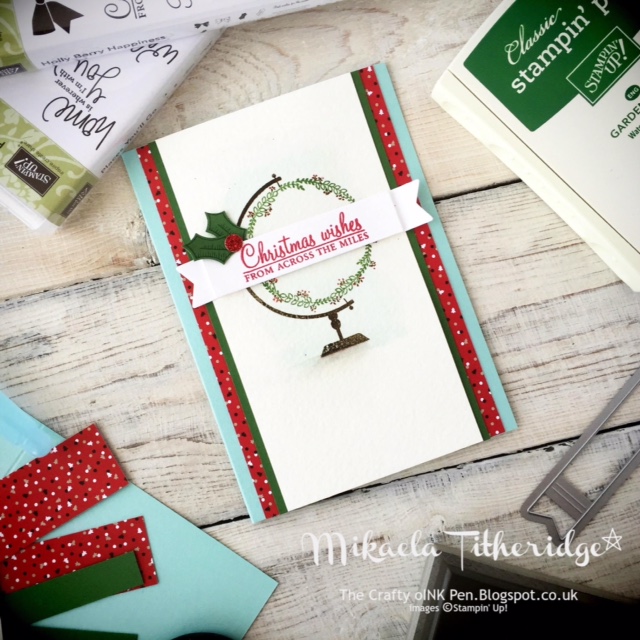
Here's a Christmas card I created for friends in far-flung places.  I really like the color combination of bold Emerald Envy and soft, subtle Mint Macaron.  You can see how well these colors work together in the Presents & Pinecones Designer Series Paper.


 You may recognize the globe, it's from a stamp set in the annual catalog called Places You'll Go - #141741.


I think this stamp set is easy to overlook in the annual catalog.  The images are simple, but the sentiments are wonderful and work for a lot of occasions.

Here's the inside of my card:

Here are the details:  The globe stand is stamped in Versamark and heat embossed with Copper Stampin' Emboss Powder.  The wreath was stamped in Emerald Envy.  I used my Real Red Stampin' Write Marker to add a few red berries around the wreath.  The rest of the stamping was done with the Holly Berry Happiness stamp set.  The bow and the holly berries were stamped in Early Espresso ink on Real Red cardstock.  The holly leaves were stamped in Emerald Envy ink on Emerald Envy cardstock.  Everything is punched with the Holly Berry Builder Punch.  The stamp set & punch are available as a bundle - #143505.  The card base is made from Mint Macaron cardstock and the Designer Paper is Presents & Pinecones.

My card was inspired by a design from another Stampin' Up demonstrator.  Here is her version:


Don't forget to stock up on Designer Papers for this and other projects, the best paper sale of the year is going on NOW!  Buy 3, get 1 free on selected designs including Presents & Pinecones.  Click here to shop in my online store.


Thanks for stopping by,
Pat


Friday, September 30, 2016

Beautiful Cards Deserve Beautiful Packaging!

Hi Stampers,

Today I want to show you how to make a simple box to hold a set of six A2 sized cards and envelopes.  This box would make a lovely presentation for a gift set of cards!


You'll need the Envelope Punch Board and a 9" square piece of cardstock.  Line up one edge at the
3-1/2" mark; score & punch.  Slide the cardstock to the 4-1/2" mark; score & punch.  Rotate the cardstock 90 degrees and repeat, lining up your previous score lines with the marker on the punch board.  Repeat for the remaining two sides.  Your cardstock should look like this:


Don't forget to use the corner rounder feature of the punch board to give your project a polished look.
Fold and burnish on all score lines.  Cut all four corners as shown here and place a small bit of tape adhesive on the outside of the box as indicated.


Place tape adhesive on the inside of the box flaps as shown here:


Now is the time to decorate the front of your box.  I used a piece of Candy Cane Lane Designer Series Paper cut at 4-1/4" x 5-5/8".  Next, remove the backing from the tape adhesive and carefully fold & assemble the box, being careful to "square up" all four corners.


To make the belly band, cut a strip of coordinating DSP or cardstock 1-1/2" x 11".  Carefully wrap it around your box, making creases at the four corners.  You may find this easiest if your box is filled with cards so it won't collapse if you press too hard.  Remove the belly band and burnish the creases with your bone folder.  Place the band back on the cardbox and adhere the ends with tape adhesive, but not too tightly - you need this to slide on & off easily!


Decorate the belly band as desired.  I used a 2-1/2" plus a 2-3/4" circle cut from Crumb Cake and Real Red cardstocks.  "Happy Christmas" from the Oh, What Fun stamp set is stamped in Versamark and embossed with Copper Stampin' Emboss Powder.  The bow from Holly Berry Happiness is stamped in Early Espresso and punched with the matching punch.

Don't forget the Designer Paper Sale starts on Saturday, October 1 - buy 3, get 1 free!  What a great time to stock up on papers for projects like this!  


Have a wonderful day,
Pat


Tuesday, August 16, 2016

Blushing Bride meets Copper

Hi Stampers,

Here are some more details on two of the note cards that make up my Thoughtful Branches Gift set!


They're the same card just oriented differently.  The first step is to stamp the "swish" from Work of Art using Soft Sky.  On this card I staggered them so that there would be color all the way across the card front.  Next I stamped the greeting as close as I could get it to the lower left corner using Early Espresso ink.  The tree trunk was stamped on a scrap of Whisper White using Versamark ink and embossed with Copper Embossing Powder then die-cut with the framelits that come in the Thoughtful Branches Bundle.  The leaves of the tree are stamped in Blushing Bride then die-cut; the second layer of the tree is die-cut from Blushing Bride cardstock without stamping.  The two birds are stamped with Flirty Flamingo.  Layering the tree with a darker color like this gives it a deeper, fuller look.  Another tip is to attach the two tree tops together opposite of each other, like this:  


I attached the tree to the card front using Snail, but Tombow liquid glue would work equally as well. The birds are attached with glue dots.


This card is made the same way, only the swishes are stacked instead of staggered.


Stop back tomorrow to take a closer look at two more of the cards that make up my Thoughtful Branches Gift set!

Happy stamping,
Pat

Monday, August 15, 2016

A Thoughtful Gift

Hi Stampers,

I've been hooked on the new Thoughtful Branches bundle since I got it.  My latest project is this set of five note cards with a matching gift box.  Thanks go to Jenny Moors, UK Stampin' Up! Demonstrator for the inspiration!  I followed her instructions for the box to a T, then put my own spin on the cards!  Here's the full set:


The cards were all made using the Stampin' Up! notecards.  They're made from thick Whisper White cardstock already scored for you, and they come twenty to a package including envelopes for $6.00 US.  I love how simple yet impressive these cards are.  The Sweet Sugarplum hydrangeas are painted with clear Wink of Stella - that's the shimmer that you see in the photo.  The tree trunk in the foreground was embossed with Copper - love it with the pinks.  Change up the greeting and this card would make a wonderful thank you for a baby shower, with its soft blue and pink hues.  Check back later this week for more details on how I made each card!

Happy stamping,
Pat