Thursday, June 30, 2022

Sending Smiles Across the Miles


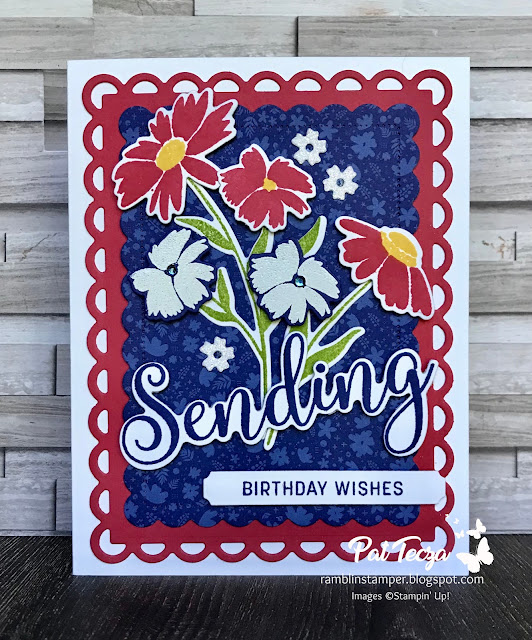
I totally cased this from Stampin' Up's Annual Catalog!

From the Stampin' Up! Designers, page 14 in the catalog.


When you struggle to come up with an idea, the catalog is a great way to get your creativity flowing!  


For the flowers, I inked the stamp with Fresh Freesia & then tapped the top half of the stamp on my Highland Heather stamp pad to get two colors on one stamp.  The stems & leaves are Granny Apple Green.  Some of the flowers are second generation (stamp once, then stamp again without re-inking).

Pro Tip:

If you try this card, stamp the flowers first and the stems second.  This way you can alter the height of each flower easily.  On my first attempt I stamped the stems first and my flowers all ended up in a straight line, not the look I wanted.


"Sending" is cut from Gorgeous Grape cardstock.  I used a piece of adhesive sheet on the back of my cardstock before cutting it to make this super easy to adhere.  See the dot above the "i"?  You'll want to have a good pair of tweezers, bright light and a little bit of patience for that :)

The piece behind the stamped panel is Fresh Freesia Shimmer Vellum (retired).  Any Designer Paper in Fresh Freesia would look good here!


Monday, June 27, 2022

Sending...a Note of Thanks!


I'm loving my Sending Smiles Bundle.  All of the different sentiments included make it so versatile!  This fabulous color combination is Fresh Freesia, Gorgeous Grape & Granny Apple Green.


This delicate die-cut in Gorgeous Grape is a perfect use for Adhesive Sheets.  To use them, cut a piece the size of your die, peel off the top paper and adhere it to the back of the cardstock.  Cut the die as you normally would (die on the front side of the cardstock).  You have effectively turned your die-cut into a sticker!

Pro Tip:

Adhere the "Sending" to a piece of white cardstock before cutting it out.  Makes placement a breeze!


On this card I used one of the Basic Borders dies to cut a piece of Hues of Happiness Designer Series Paper.  This is the "B" side of the paper - kind of like the "B" side on your old 45's - you know what I'm talking about if you're a certain age...LOL!


This one uses two Stitched Rectangles for the background.  I mounted the flower on a circle of Basic White so it didn't get lost on the busy background.


Product List


Thursday, June 23, 2022

Feeling Patriotic!


With Independence Day just around the corner, I'm feeling the red, white & blue vibe.  I've said it before, but Sending Smiles is such a versatile bundle!  Here I've used Basic White Thick cardstock, Sweet Sorbet & Starry Sky.  Plus, Daffodil Delight for the flower centers & Granny Apple Green for leaves.

This is a second version - same colors, totally different look.


This one uses a background of Starry Sky Designer Series Paper.  The 2 larger white flowers are heat embossed with White Stampin' Emboss Powder on Starry Sky cardstock to make them "pop" against the background.  The 3 tiny flowers are cut from White Glimmer Paper - this has returned in the July-December Mini Catalog, YAY!!


Dressed up or dressed down?  What's your favorite?


Product List

Thanks for visiting today!


Monday, June 20, 2022

One Minute You're Young and Cool...


or new placemats...or new curtains...or in my case, new stamps.

This stamp set has been on my wish list since the last Mini Catalog came out last January.  When I saw it on the Retiring List at 50% off  ($9.50),  I jumped on it!  And I've been having a ball playing with it this week.

This card incorporates a lot of my favorite things - simple design, masking technique, blending brushes and bold colors.  

I used Grid Paper to get my stripes nice & straight.  I have 1" wide Post-It Note tape that I cut into smaller strips on my trimmer.  I haven't been able to find this tape in stores but you can get it at Amazon.   It's also what I use to hold my steel dies in place when I'm cutting.


I used Night of Navy, Balmy Blue & Granny Apple Green with Blending Brushes to make the stripes.  Notice the third stripe from the right side is a different shade of green?  That happened when I accidentally picked up some blue off the Post-It Tape and it mixed with the green I was using.  I liked it, so I went with it!

The horizontal stripe is what really makes this card look like a towel.  I made this one using the retired Greenery Embossing Folder cut into strips.  I'm sure there are a lot of other folders that could make a similar pattern - or you could use a plain strip of cardstock or maybe some washi tape.

I stamped "Happy Birthday" on a piece of Balmy Blue cardstock, cut it with one of the Sending Dies and glued it in place on the label.  A trio of your favorite coordinating gems adds sparkle.

This is one of the Seasonal Labels dies.  To get the color layer behind it, I cut the label in half -

Pretty slick!


All of my 30 - 40 something friends are getting one of these cards this year.  If you're reading this, just sayin'!  Try to act surprised :)

If you love this, Bragworthy is on the Retiring List and it will be gone forever by June 30 (or sooner if it sells out early.)  So don't hesitate, order it today at 50% off the original price!


Product List