Showing posts with label Work of Art. Show all posts

Tuesday, May 29, 2018

Work of Art Thank You Cards

Hi Friends,

Just a quick share today of some more thank-you cards I made for the baby shower.  These go together really easily and you can feel so artistic mixing colors!


The stamp set is a retiring favorite I've told you about before...Work of Art.  I love it for simple cards like this and there's really nothing else in the catalog like it!  The "thank you" comes from One Big Meaning, which is also on the retiring list, but if you're like me you have lots of choices when it comes to "thank you" stamps.


You can make these in a rainbow of colors...so much fun to mix & match!

How I made the splatters...


Add a drop of ink to the inside of the lid of your same color stamp pad.  Using a water-filled Aqua Painter, swirl it around in the ink to fill the brush with ink.  Using a craft knife (or a pallet knife or butter knife, whatever you have), draw the bristles toward you and let the ink splatter onto the cardstock.  Less water on the brush will give you smaller splats - more water makes them larger.  As always with a new technique, practice on a piece of scrap paper until you are confident!  And do be sure to protect your work surface from errant splatters!


Just a gentle reminder...after Thursday some of these products are no longer available through Stampin' Up.  Click any of the links at the end of this post to purchase now!

I meet so many nice people stamping...


This week I received a surprise in the mail from one of my customers in Iowa.  This lovely lady sent me a beautiful cross-stitched bib for my baby granddaughter!  Stampers are the nicest, most thoughtful people.  Thank you, Jackie!


Product List
Thanks for stopping by!
Pat

Saturday, April 15, 2017

Let's Thank Our Heroes

Hey Friends!

Today I'm sharing cards I designed to show appreciation for our nation's military heroes.  A friend asked me for a set of cards she could use to send to retired military friends on Veteran's Day, but why wait for a special day?  Our troops both active & retired need to know they are appreciated everyday!

These are quick and easy to make.  Both use only two colors of ink - Real Red and Dapper Denim -on a Thick Whisper White card base.


There are four different stamp sets that I used on these cards.  The sad thing is, three of the four are on the retiring list!  I use them all a lot, and will continue using them for my own personal projects.  On the first card, the swooshes and hearts are from Work of Art.  This one is carrying over to the new catalog coming in June.  The "thank you" is from Tin of Cards, and "for your service" is from Endless Thanks, both retiring in May.  The white star is die-cut from Dazzling Diamonds Glimmer Paper with the Stars Framelits Dies.  The Stars Framelits are also on the retiring list.


The second card uses Gorgeous Grunge to make the spatters across the card - I stamped 2 different images multiple times to get this effect.  Gorgeous Grunge is retiring and will no longer be available after May 31.  The stars once again are cut using the Stars Framelits (retiring) out of Dazzling Diamonds and Red Glimmer Paper.  The smallest stars were punched out with a previously retired punch.


I used Real Red & Dapper Denim  cardstock to make a box that holds a dozen of these cards and envelopes using my Envelope Punch Board.  The square decorating the boxtop was cut with the Stitched Shapes Framelits.

I hope you have enjoyed this project!  

Visit my website today to see the complete list of retiring products.  Any order that contains one or more of the retiring stamps or dies used in this project will get a free pdf instruction sheet of how to make the card box - just make sure to provide me with your email address!


Happy stamping,
Pat


Monday, September 5, 2016

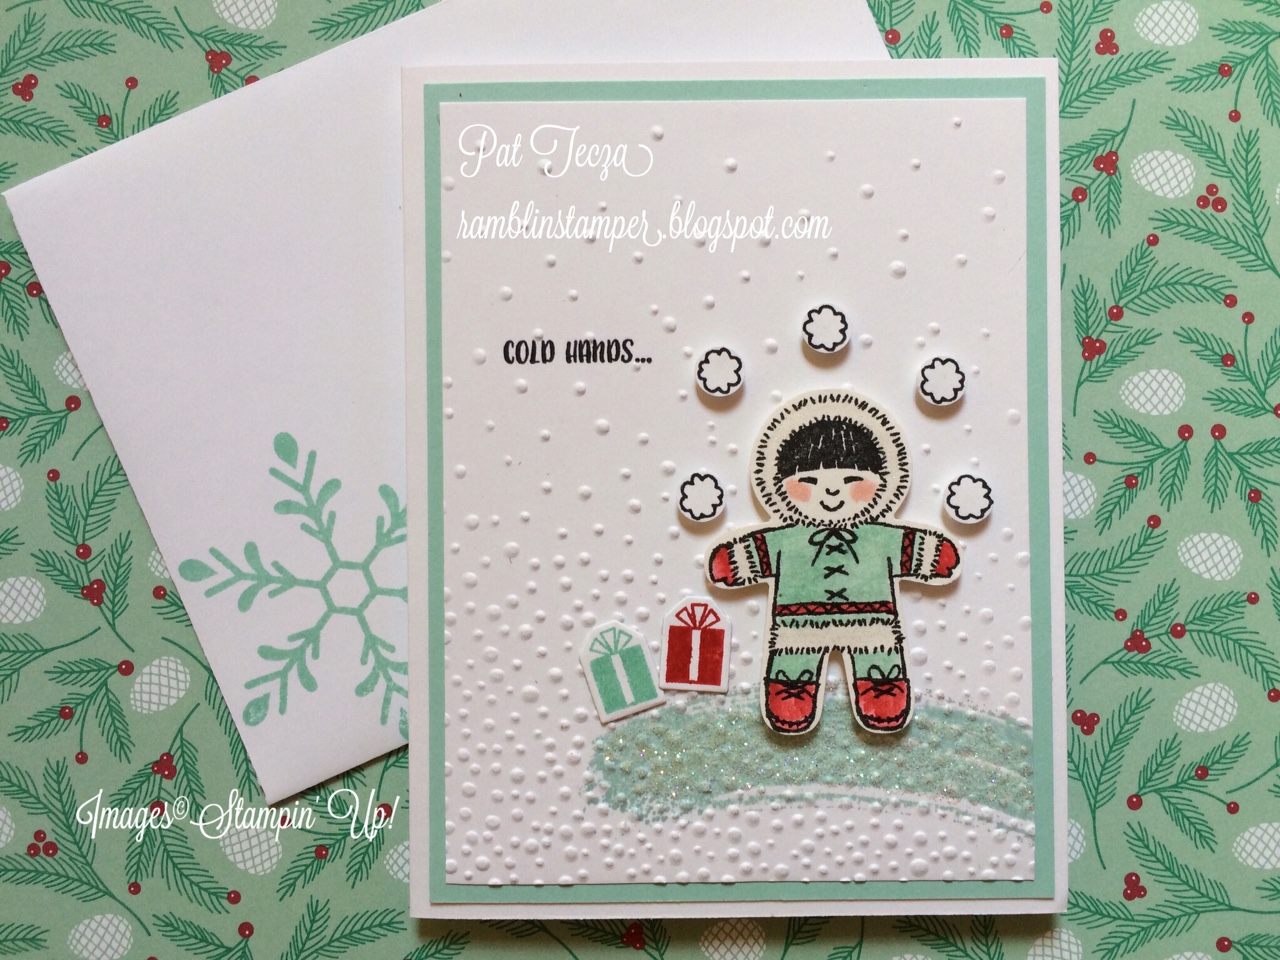
Cold Hands ... Warm Heartfelt Greetings

Hi Stampers,

I've been busy creating lots of fun holiday cards to share with you using some of the great new products from the 2016 Stampin' Up Holiday Catalog.

I wasn't sure how I felt about this stamp until I actually played with it...now I think that this little Eskimo girl (yes, she is a girl!) is the cutest thing ever!


Isn't she sweet standing on a snowbank juggling snowballs with presents by her side?  My colors are Pool Party and Real Red.  She is part of the brand-new Cookie Cutter Christmas bundle just released on September 1.  I love that there is a matching punch that's part of this bundle, it's so quick & easy to punch her out along with the snowballs.  I stamped her on Shimmery White cardstock & used my Blender Pens to color.  A little touch of Blushing Bride gives her rosy cheeks!  I added a wash of Clear Wink of Stella to the fur on her snowsuit for shimmer.  The presents are from the Peaceful Pines stamp set.  They are adhered directly to the card front with liquid Tombow, but my little girl and her snowballs are popped up with Dimensionals.

The snowbank she's standing on is the "swish" from Work of Art.  I use this swish all the time when I need something to "anchor" an image, rather than letting it "float" on the card.  Can you see the sparkle on it?  I spread a layer of Tombow glue on top of the swish & sprinkled it with Dazzling Diamonds Glitter.  Here's a photo that shows it better:


The Softly Falling Embossing Folder gives this card dimension.  Just be sure to stamp the swish & sentiment before using the embossing folder-you won't be able to do it after.  The glitter should be added after the embossing.  It will work fine if you use the glitter before you emboss, but you'll be cleaning glitter out of your folder 'till the cows come home.  Yup, I'm a country girl.


The inside sentiment is part of the Cookie Cutter Christmas bundle too...love how it works with the front sentiment.  The tiny stars and the snowflake on the envelope are from the stamp set Holly Jolly Greetings.  Those two little red hearts?  They're another component of the Cookie Cutter Christmas bundle, punched from Red Glimmer Paper and attached with a drop of  Tombow.

I hope you've enjoyed seeing how I made this card, the third one in my Cookie Cutter Christmas series.  If you're ready to order yours, I would be happy to help you out.  Click the link below to jump over to my online store and search for #143493.


Happy Stamping,
Pat


Thursday, August 18, 2016

Pretty in Pink

Hi Stampers,

Here is the final card that makes up my Thoughtful Branches Gift set:


Like the other cards in the set, the "swish" from Work of Art is stamped in Soft Sky ink and the greeting is stamped in Early Espresso.  The little birdie perched on "thank you" is stamped in Blushing Bride.  The trees are a group of three stamped twice in Soft Suede.  The leaves on the trees are all stamped once in Blushing Bride, then the middle three tree tops are stamped again in Flirty Flamingo.  It doesn't show in the photo, but the last step to make this card awesome is to stamp three of the tree tops in Versamark and sprinkle with my favorite Iridescent Ice embossing powder.  I was very sad when that embossing powder was retired - luckily, it lasts a long, long time!

Here is the box that holds the card set:


"For you" is embossed in Copper.  The box was made from Tip Top Taupe cardstock using the Gift Bag Punch Board .  The finished dimensions of the box are 4" x 2" x 2 3/4" tall.  The sides are decorated with separately cut pieces of Tip Top Taupe embossed with the Petal Burst Embossing Folder.  The box wrap is made from two pieces of Soft Sky cardstock cut at 8 1/4" x 2" joined at the bottom of the box and punched at the top with the Scalloped Tag Topper Punch.  A gold binder clip provides the closure.


Thanks for stopping by to look at these projects today!
Pat


Wednesday, August 17, 2016

More Thoughtful Branches Plus Tips & Tricks for the Big Shot

Hi Stampers,

As promised, today I want to show you two more of the designs from my Thoughtful Branches Gift set.

The top layer of the hydrangea is stamped on Sweet Sugarplum cardstock using Sweet Sugarplum ink.  Then I covered it with a layer of clear Wink of Stella and layered it on top of another hydrangea cut from Rich Razzleberry cardstock.  The leaves are die-cut from Pear Pizzazz.  The "swishes" are from Work of Art, stamped in Soft Sky.  The sentiment is stamped in Early Espresso.


With all of this intricate die-cutting going on, it seems a good time to share this video about using the Precision Base Plate with your Big Shot and keeping your cutting pads flat!


Thanks for stopping by,
Pat

Tuesday, August 16, 2016

Blushing Bride meets Copper

Hi Stampers,

Here are some more details on two of the note cards that make up my Thoughtful Branches Gift set!


They're the same card just oriented differently.  The first step is to stamp the "swish" from Work of Art using Soft Sky.  On this card I staggered them so that there would be color all the way across the card front.  Next I stamped the greeting as close as I could get it to the lower left corner using Early Espresso ink.  The tree trunk was stamped on a scrap of Whisper White using Versamark ink and embossed with Copper Embossing Powder then die-cut with the framelits that come in the Thoughtful Branches Bundle.  The leaves of the tree are stamped in Blushing Bride then die-cut; the second layer of the tree is die-cut from Blushing Bride cardstock without stamping.  The two birds are stamped with Flirty Flamingo.  Layering the tree with a darker color like this gives it a deeper, fuller look.  Another tip is to attach the two tree tops together opposite of each other, like this:  


I attached the tree to the card front using Snail, but Tombow liquid glue would work equally as well. The birds are attached with glue dots.


This card is made the same way, only the swishes are stacked instead of staggered.


Stop back tomorrow to take a closer look at two more of the cards that make up my Thoughtful Branches Gift set!

Happy stamping,
Pat

Friday, May 6, 2016

The Excitement is Building...

Good morning stampers,

Did you see the cover of the new catalog on the left side of the page?  It's got so many beautiful new products in it that my wish list is overflowing (again)!  I have a supply of the new catalogs on order and I can't wait to get them so I can share them with all my customers.  The new In-Colors are delicious - Dapper Denim, Emerald Envy, Flirty Flamingo, Peekaboo Peach & Sweet Sugarplum!

In the meantime, I'm still full of ideas using stamps and colors from the current catalogs.  Here is a card and gift box I created for a friend's birthday last week using the Botanical Blooms stamp set & thinlits:


The colors for both are Basic Black, Hello Honey, Very Vanilla, Blushing Bride, Rose Red & Pear Pizzazz.  I sponged the center of the large flowers with Rose Red and the Hello Honey middles (stamens?) are sponged with Hello Honey.  The "celebrate" on the card is from the Endless Birthday Wishes stamp set.  The "Just for You" on the box comes from Work of Art.  All 3 banners on the box are punched with the Triple Banner Punch.  The box is a wonderful size, and can be made with just a scoreboard - no special tools needed!  I filled this box with mini Ghiradelli chocolates...mmm...can't go wrong with that!  It's a nice 2" deep and sturdy, so it holds a lot of candy.  This is also a great box for a gift of jewelry.  UK Demonstrator Sam Hammond has a wonderful You Tube video that shows how the box is made-you can view it below:


Have a wonderful day,
Pat

Saturday, February 13, 2016

Brand-new Stamps!! Yay!

Hello again!

Beginning on February 16, Stampin ' Up has 2 new stamp sets that you can earn for FREE with any $50 purchase!  Biking is one of my favorite activities, so the Pedal Pusher stamp set really appeals to me.  It's great all by itself, but I also love the way it works with the stamp sets I already own.  On this card, I added the sun image from Kinda Eclectic, the "swish" from Work of Art, and of course the grunge is from one of my all-time favorites, Gorgeous Grunge.  The "Hi" is from the other brand-new stamp set which becomes available on Tuesday, Party Pants.  I'm working on a card to show you that uses this set, too!


Check out these 2 new stamp sets on my website beginning February 16.  Be sure to look for the third new Sale-a-Bration item also, a set of 3 rolls of gorgeous glitter tape in gold, silver & white!  (Hint:  you can color the white with a sponge dauber to match any color!)

Happy Stamping,
Pat

Monday, August 10, 2015

Clean & Simple

Good Monday Morning!

I have two quick cards to share with you today.  The first is a thank-you card for one of my Stampin' Up! customers.  I used the stamp set Endless Thanks.  It has so many nice ways to say "thank you", I know I will be using this one a lot.  The background is stamped with Gorgeous Grunge.  My colors are Rich Razzleberry, Pool Party & Pear Pizzazz.  Flowers from the Itty Bitty Accents punch trimmed with rhinestones and a few loops of metallic thread finish this card.


The second card is one I made for my son and daughter-in-law's anniversary this week.  I pulled out an IO stamp, an oldie but goodie that I've always loved for cards like this.  I love the way the "swishes" from Work of Art emphasize the image.  I used Crumb Cake for the base and Baja Breeze (retired) for the mat.  It doesn't show up well in the photo, but the bottom swish is stamped with heat & stick powder then glittered - it's really simple but beautiful.  The top swish is Baja Breeze.


Monday, August 3, 2015

Sunset Balloon Ride

Good Monday Morning!

I hope everyone had a nice weekend.  Mine was very relaxing - a little bike riding, a little crafting, just enjoying the beautiful weather we're having (finally!)

A couple of weeks ago I got the Celebrate Today stamp set and I've been anxious to play with it.  I'm pretty pleased with my first project, I hope you like it!  A hot air balloon ride at sunset is on my bucket list and this is how I imagine it will be...


My card base is Whisper White, the mat is Night of Navy and the scene was created on Whisper White.  I started by stamping the stars in the sky using Versamark & embossing them with clear embossing powder. Then I created a mask using the Circles Collection Framelits and sponged it with Calypso Coral. Next I removed the mask and started sponging the sky, working upward, in this order: Daffodil Delight, Soft Sky, Marina Mist, Elegant Eggplant and Night of Navy. The clouds are from Work of Art, using Elegant Eggplant stamped off once. The trees are from Lovely as a Tree, stamped in Memento Tuxedo Black.  The basket on the balloon is also Tuxedo Black. The sentiment and stars on the balloon are stamped in Versamark and embossed in gold on Night of Navy cs.  I then cut out the balloon using the Balloon Framelits Dies and adhered it to the card front.  I finished the card with a sprinkle of sequins from the Brights Sequin Assortment, just because I like the effect.  This card was a lot of fun to make and I'm sure I'll be using this stamp set often!

Happy Stamping,
Pat