Hi Stampers,
I've been busy creating lots of fun holiday cards to share with you using some of the great new products from the 2016 Stampin' Up Holiday Catalog.
I wasn't sure how I felt about this stamp until I actually played with it...now I think that this little Eskimo girl (yes, she is a girl!) is the cutest thing ever!
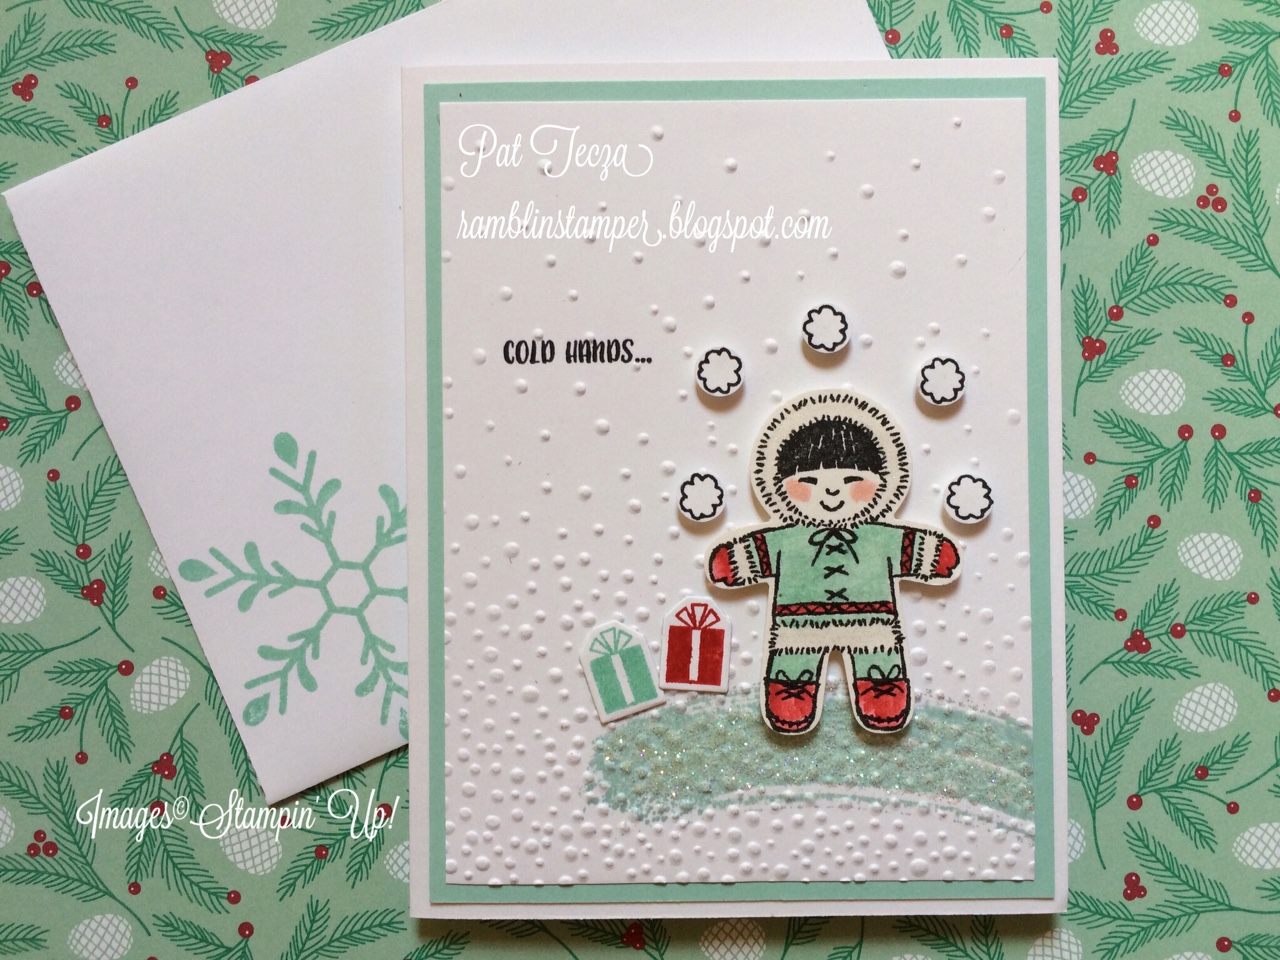
Isn't she sweet standing on a snowbank juggling snowballs with presents by her side? My colors are Pool Party and Real Red. She is part of the brand-new Cookie Cutter Christmas bundle just released on September 1. I love that there is a matching punch that's part of this bundle, it's so quick & easy to punch her out along with the snowballs. I stamped her on Shimmery White cardstock & used my Blender Pens to color. A little touch of Blushing Bride gives her rosy cheeks! I added a wash of Clear Wink of Stella to the fur on her snowsuit for shimmer. The presents are from the Peaceful Pines stamp set. They are adhered directly to the card front with liquid Tombow, but my little girl and her snowballs are popped up with Dimensionals.
The snowbank she's standing on is the "swish" from Work of Art. I use this swish all the time when I need something to "anchor" an image, rather than letting it "float" on the card. Can you see the sparkle on it? I spread a layer of Tombow glue on top of the swish & sprinkled it with Dazzling Diamonds Glitter. Here's a photo that shows it better:
The Softly Falling Embossing Folder gives this card dimension. Just be sure to stamp the swish & sentiment before using the embossing folder-you won't be able to do it after. The glitter should be added after the embossing. It will work fine if you use the glitter before you emboss, but you'll be cleaning glitter out of your folder 'till the cows come home. Yup, I'm a country girl.
The inside sentiment is part of the Cookie Cutter Christmas bundle too...love how it works with the front sentiment. The tiny stars and the snowflake on the envelope are from the stamp set Holly Jolly Greetings. Those two little red hearts? They're another component of the Cookie Cutter Christmas bundle, punched from Red Glimmer Paper and attached with a drop of Tombow.
I hope you've enjoyed seeing how I made this card, the third one in my Cookie Cutter Christmas series. If you're ready to order yours, I would be happy to help you out. Click the link below to jump over to my online store and search for #143493.
Happy Stamping,
Pat
Showing posts with label Holly Jolly Greetings. Show all posts
Monday, September 5, 2016
Thursday, September 1, 2016
Cookie Cutter Christmas
Hi Stampers!
Welcome to the first of many projects from the fabulous 2016 Stampin' Up Holiday Catalog!
This card showcases one of my favorite new bundles, Cookie Cutter Christmas. This stamp set has the cutest images. In addition to gingerbread men, there's a reindeer, Santa, Eskimo, and a bear, plus coordinating greetings and accents like the hearts you see here.
This little guy is cute all on his own, but I had the idea that one was not enough, so I decided to stack them up like gymnasts...must still be thinking about the Rio Olympics! My card base is Crumb Cake. I stamped the gingerbread men in Early Espresso and punched them out with the coordinating punch. The same punch also made the hearts, which are punched from Real Red. My greeting and the background stamp are both from Holly Jolly Greetings, stamped in Real Red. The designer paper is the new Candy Cane Lane Designer Series Paper. There's also Candy Cane Lane Baker's Twine, which comes in a 2-spool pack, Real Red and Whisper White with red metallic thread running through it.
Here's the inside of my card:
Another thing I really like about this bundle is that there is another stamp set in the Holiday Catalog that uses this punch - Cookie Cutter Halloween! The characters in that set include a scarecrow, mummy, skeleton & Dracula. Two stamp sets and one punch can take care of your crafting needs for Halloween and Christmas!
The Holiday Catalog is available to order from starting today, September 1.
Happy shopping,
Pat
Welcome to the first of many projects from the fabulous 2016 Stampin' Up Holiday Catalog!
This card showcases one of my favorite new bundles, Cookie Cutter Christmas. This stamp set has the cutest images. In addition to gingerbread men, there's a reindeer, Santa, Eskimo, and a bear, plus coordinating greetings and accents like the hearts you see here.
This little guy is cute all on his own, but I had the idea that one was not enough, so I decided to stack them up like gymnasts...must still be thinking about the Rio Olympics! My card base is Crumb Cake. I stamped the gingerbread men in Early Espresso and punched them out with the coordinating punch. The same punch also made the hearts, which are punched from Real Red. My greeting and the background stamp are both from Holly Jolly Greetings, stamped in Real Red. The designer paper is the new Candy Cane Lane Designer Series Paper. There's also Candy Cane Lane Baker's Twine, which comes in a 2-spool pack, Real Red and Whisper White with red metallic thread running through it.
Here's the inside of my card:
The sentiment is from Cookie Cutter Christmas, and the stars are part of the Holly Jolly Greetings stamp set.
The Holiday Catalog is available to order from starting today, September 1.
Happy shopping,
Pat
Monday, June 27, 2016
Christmas Sampler Card
Hi Stampers,
Looking for a way to use some more of your Designer Paper stash? Here's a card that uses a mix of current products and retired papers. Quilters, you may enjoy this design - best of all, no sewing required! Unless you enjoy that kind of thing, lol!
But cut those adorable little Santa faces into one-inch squares and they are charming! The stripes are the reverse side of the dsp, so there's very little waste when you make this card.
The greeting comes from the Holly Jolly Greetings stamp set and Christmas Greetings thinlits dies .
The trickiest part of making this card is lining the squares up in a straight grid pattern. Here's how I did it:
Start by cutting a 3 1/2" square of Real Red cardstock. Use your Simply Scored tool to create a grid by scoring at 1/8", 1-1/8", 1-1/4", 2-1/4", 2-3/8", and 3-3/8". Rotate the cardstock 90 degrees and repeat on the second side. Now your cardstock should look like this:

Use Tombow Multipurpose Liquid Glue on the back of each square to give yourself a little extra time to position each square perfectly. Easy-peasy!
I hope you've enjoyed my mini-tutorial. Now let's get stampin'!
Pat
Looking for a way to use some more of your Designer Paper stash? Here's a card that uses a mix of current products and retired papers. Quilters, you may enjoy this design - best of all, no sewing required! Unless you enjoy that kind of thing, lol!
I love all of the designer papers from last season, but on their own, they can be too busy for my tastes-
But cut those adorable little Santa faces into one-inch squares and they are charming! The stripes are the reverse side of the dsp, so there's very little waste when you make this card.
The greeting comes from the Holly Jolly Greetings stamp set and Christmas Greetings thinlits dies .
The trickiest part of making this card is lining the squares up in a straight grid pattern. Here's how I did it:
Start by cutting a 3 1/2" square of Real Red cardstock. Use your Simply Scored tool to create a grid by scoring at 1/8", 1-1/8", 1-1/4", 2-1/4", 2-3/8", and 3-3/8". Rotate the cardstock 90 degrees and repeat on the second side. Now your cardstock should look like this:
Use Tombow Multipurpose Liquid Glue on the back of each square to give yourself a little extra time to position each square perfectly. Easy-peasy!
I hope you've enjoyed my mini-tutorial. Now let's get stampin'!
Pat
Sunday, December 13, 2015
Happy Holidays
It's less than 2 weeks till the big day - how are your holiday plans progressing? Hopefully your handmade cards are done or nearly there, but just in case, here's another sample for inspiration!
The colors on this card are Pool Party and Whisper White. The snow bank was cut freehand. The trees are from the Peaceful Pines stamp set #139728 and the Perfect Pines framelits #139665. The snow bank is embossed with the Softly Falling embossing folder, #139672. "Peace" was cut from the Christmas Greetings Thinlits dies #139659 and "on earth" is from Holly Jolly Greetings #139879. The snowy background is stamped in Pool Party using images from both Peaceful Pines and Holly Jolly Greetings. The design on the tree in the foreground was embossed using silver embossing powder. The background tree has a silver foil sheet behind it shining through. Lastly, the star is punched using the Itty Bitty Accents punch #133787 and Dazzling Diamonds Glimmer Paper #135315. Visit my online store to purchase these or any other supplies for your crafting fix-stampwithptecza.stampinup.net

Subscribe to:
Posts (Atom)