Showing posts with label Holly Berry Happiness. Show all posts

Saturday, October 1, 2016

Christmas Wishes from Across the Miles

Hi Stampers,

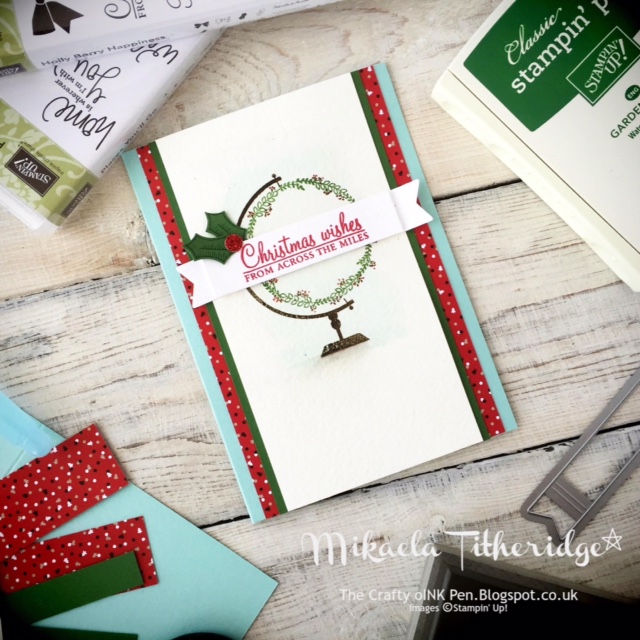
Here's a Christmas card I created for friends in far-flung places.  I really like the color combination of bold Emerald Envy and soft, subtle Mint Macaron.  You can see how well these colors work together in the Presents & Pinecones Designer Series Paper.


 You may recognize the globe, it's from a stamp set in the annual catalog called Places You'll Go - #141741.


I think this stamp set is easy to overlook in the annual catalog.  The images are simple, but the sentiments are wonderful and work for a lot of occasions.

Here's the inside of my card:

Here are the details:  The globe stand is stamped in Versamark and heat embossed with Copper Stampin' Emboss Powder.  The wreath was stamped in Emerald Envy.  I used my Real Red Stampin' Write Marker to add a few red berries around the wreath.  The rest of the stamping was done with the Holly Berry Happiness stamp set.  The bow and the holly berries were stamped in Early Espresso ink on Real Red cardstock.  The holly leaves were stamped in Emerald Envy ink on Emerald Envy cardstock.  Everything is punched with the Holly Berry Builder Punch.  The stamp set & punch are available as a bundle - #143505.  The card base is made from Mint Macaron cardstock and the Designer Paper is Presents & Pinecones.

My card was inspired by a design from another Stampin' Up demonstrator.  Here is her version:


Don't forget to stock up on Designer Papers for this and other projects, the best paper sale of the year is going on NOW!  Buy 3, get 1 free on selected designs including Presents & Pinecones.  Click here to shop in my online store.


Thanks for stopping by,
Pat


Friday, September 30, 2016

Beautiful Cards Deserve Beautiful Packaging!

Hi Stampers,

Today I want to show you how to make a simple box to hold a set of six A2 sized cards and envelopes.  This box would make a lovely presentation for a gift set of cards!


You'll need the Envelope Punch Board and a 9" square piece of cardstock.  Line up one edge at the
3-1/2" mark; score & punch.  Slide the cardstock to the 4-1/2" mark; score & punch.  Rotate the cardstock 90 degrees and repeat, lining up your previous score lines with the marker on the punch board.  Repeat for the remaining two sides.  Your cardstock should look like this:


Don't forget to use the corner rounder feature of the punch board to give your project a polished look.
Fold and burnish on all score lines.  Cut all four corners as shown here and place a small bit of tape adhesive on the outside of the box as indicated.


Place tape adhesive on the inside of the box flaps as shown here:


Now is the time to decorate the front of your box.  I used a piece of Candy Cane Lane Designer Series Paper cut at 4-1/4" x 5-5/8".  Next, remove the backing from the tape adhesive and carefully fold & assemble the box, being careful to "square up" all four corners.


To make the belly band, cut a strip of coordinating DSP or cardstock 1-1/2" x 11".  Carefully wrap it around your box, making creases at the four corners.  You may find this easiest if your box is filled with cards so it won't collapse if you press too hard.  Remove the belly band and burnish the creases with your bone folder.  Place the band back on the cardbox and adhere the ends with tape adhesive, but not too tightly - you need this to slide on & off easily!


Decorate the belly band as desired.  I used a 2-1/2" plus a 2-3/4" circle cut from Crumb Cake and Real Red cardstocks.  "Happy Christmas" from the Oh, What Fun stamp set is stamped in Versamark and embossed with Copper Stampin' Emboss Powder.  The bow from Holly Berry Happiness is stamped in Early Espresso and punched with the matching punch.

Don't forget the Designer Paper Sale starts on Saturday, October 1 - buy 3, get 1 free!  What a great time to stock up on papers for projects like this!  


Have a wonderful day,
Pat